Thursday, December 9, 2010

Recycle a Shirt into a Pillow!

I love to recycle garments. Mostly because I fall in love with a print and can't bear to throw something away that is so gorgeous. Recently, I discovered that the princess had grown out of a few sweatshirts that her Daddy proudly picked out for her. I couldn't bring myself to let go of them, and came up with a lovely idea! Mini pillows for her bed!

From Shirt to Pillow

They are super cute and so easy to make. I whipped each one out in only a few minutes. Here's how it's done.

1. Scavenge around for an old garment. Here, I am using a too small sweatshirt.

From Shirt to Pillow

2. Cut off the arms, hood and waistband. Make it easy on yourself and cut it in a nice square shape. Make sure you take into account your seam allowances, and leave extra at the bottom. It can always be cut off later if it's too much.

From Shirt to Pillow

3. Here's what you'll have. If you cut both sides at once, you should have two squares.

From Shirt to Pillow

From Shirt to Pillow

4. Now, place RIGHT sides together, WRONG sides out, and serge or sew three sides together. Leave the bottom open.

From Shirt to Pillow

Here's what you should have. A square with the top and sides sewn together and the bottom open.

From Shirt to Pillow

5. Turn the pillow right side out.

From Shirt to Pillow

6. Stuff it with fiberfill.

From Shirt to Pillow


From Shirt to Pillow

7. Now, to close it, fold the bottom edges in.

From Shirt to Pillow

8. Pinch shut.

From Shirt to Pillow

9. And pin.

From Shirt to Pillow

10. Sew shut.

From Shirt to Pillow

And you're finished! That was super easy!

From Shirt to Pillow

If you do not like the bottom edge, you can hand sew it shut using a whipstitch, which will give it a more invisible seam. I don't have the patience to hand sew anything, but if I were making this for someone else, I would most likely do that. For me, sewing it shut with my machine is just fine.

Here's another sweatshirt.

From Shirt to Pillow

Now, it too is a pillow. I sewed the button placket shut to discourage any fiberfill leakage.

From Shirt to Pillow

I'd love to see your garments-turned-pillows! Upload them to Pineapple Damask Group's Flickr Photo Pool

From Shirt to Pillow

My First Quilt

I love blankets and have a large collection of them, most are on my bed, but many are in strategic places around the house. I love to cuddle under them, lay upon them, I even wear a lap blanket in the car during the winter! Ironically enough, I had never made a blanket. And what better blanket to make than a quilt? This isn't a usual how-to tutorial, because I am still perfecting my quilt making skills. So, this is more of a generalization of how I pieced it together.

My first quilt was far from flawless, but to me, it's perfect. It's a small lap quilt, about 40x60 inches (minus a bit here and there!) Here it is strewn across my couch.

From Quilt


As you can see, I used scraps from my pj bottoms to make one of the borders! So, here's what I did.

1. First, I penciled a little diagram of what I wanted it to look like, then I figured out how large to cut each strip of material. I wanted it to be about 40x60, and with each strip, I needed to include a seam allowance as well. The middle panel (Christmas Trees) is 17x37, then I cut 2 pink strips 4x37 (sides) and 2 pink strips 4x24 (top and bottom), then 2 ornaments 7x35 (top and bottom) and 2 ornaments 7x44 (sides). The final pink border was 2 strips 4x55 (sides) and 4x41 (top and bottom). The red is bias tape.


From Quilt


From Quilt

2. Then, I started piecing it together. I serged the pink strips to the sides and then the top of the Christmas trees. I pressed the seams towards the darker material, which was the solid pink.

From Quilt

3. Then, I added the ornament strips and pressed the seams toward the darker material.

From Quilt

4. I added the second border of pink strips and pressed the seam down. Now, the front panel is finished!

From Quilt

5. I laid down my back panel (which was the pink material), laid the quilt batting on top of it, then laid the front panel on top of that. (Quilters refer to this as assembling the "quilt sandwich.") I used curved safety pins every 4 inches all over the quilt to secure it.

From Quilt


From Quilt

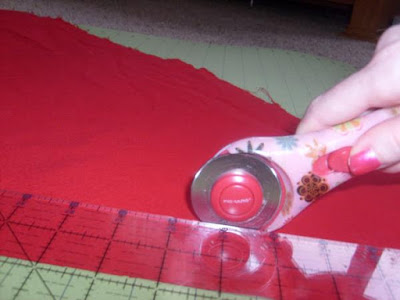
6. Then, I quilted it. I only have a regular sewing machine, not a fancy long armed quilting machine that does all sorts of fancy designs, so I just sewed diagonal lines across the entire quilt, using scotch tape as my guide. Other ways to quilt include handquilting (no way do I have that sort of patience), hand tying (every 4 inches or so across the quilt, make a single stitch through all three layers with yarn and tie a knot to secure), "stitch in the ditch" (stitching along the seams of the borders), etc etc. Basically, anything you want to do is acceptable. It is, after all, your quilt.

From Quilt

7. Then it needed to be bound, because the edges were exposed. I made double fold bias tape and pinned the tape to the edges of the quilt. Don't know how to make bias tape? View my tutorial here!Make Your Own Bias Tape
From Quilt

Then I sewed it in place.

From Quilt

There are many different ways to bind a quilt. This was easiest for me, mainly because I don't have the patience to hand sew anything, which hard core quilters seem to love to do.

And there you have it, my very first quilt! It's super cozy.

From Quilt


Were you inspired? Post pictures of your quilts to the Pineapple Damask Group's Flickr Photo Pool!

Make Your Own Bias Tape

Binding tape has many uses, and most savvy sewers know how to make their own. (You can buy it, but it's a bit pricey.) The most versatile of binding tape is bias tape, so it can curve with the item to which it is bound. Here, I am going to show you how to make single and double fold bias tape.

First, we need to know some of the properties of grain in order to understand why we make it the way we do. If you look at your material, selveges on the left and right, the straight across threads (perpendicular to the selvedge and parallel to the cut edges) are referred to as the crosswise grain. They have very little stretch. The threads that are parallel to the selvedges are referred to as the lengthwise grain. They may give more than the crosswise, but still very little stretch. The threads which run at right angles, diagonally across the fabric is the bias grain. Pull in this direction, and the fabric will stretch. A fabric cut on the bias will be very drapy and will curve beautifully. I love making bias skirts!

Therefore, when making bias tape, we will be cutting strips of fabric on the bias grain. Here's the easiest way to do it correctly everytime!

1. Lay your fabric on your cutting board with the selvedges on the left and the right (cut sides are at the top and bottom).

From Bias Tape

2. Fold the top right side down at a right angle, so the cut edge meets the left selvedge. The threads parallel to the fold are the bias grain.

From Bias Tape


3. Cut strips parallel to the folded edge. I am cutting mine about 1 and 3/4 inches wide, since I am making 1 inch double fold bias tape.

From Bias Tape

4. As what usually happens, your strips will not be long enough for your project, so we need to sew them, end to end, in order to make them long enough. But, they have to be sewn in such a way to preserve the bias. Therefore, put two strips together in a right angle.

From Bias Tape


5. Sew them together, at a right angle, corner to corner widthwise.

From Bias Tape


From Bias Tape


6. On the back, there will be a large seam. Trim it to 1/4"

From Bias Tape


From Bias Tape

7. Press the seam open.

From Bias Tape


9. Now, if you are making single fold bias tape, simply fold the strip in half, lengthwise, and press...making sure the seam is on the inside of the fold! Then, you're done! But if you are making double fold bias tape, then you will need to feed the strip into a bias tape maker (I found mine in the quilting section at JoAnn's for around $3). Pull the strip through the maker running your iron behind it, pressing the folds in place.

From Bias Tape

10. This is what it will look like as you are making it. Voila! You just made double fold bias tape and it was super easy! Note, as you are feeding the strips into the maker, ensure that the seam is encased in the folds!

From Bias Tape


Yes, I definitely need a new cover for the ironing board. Truth be told, it's my moms! It's also just about 40 years old (MUCH older than I am) and a real pain in the neck.

If you have any questions, email me!