
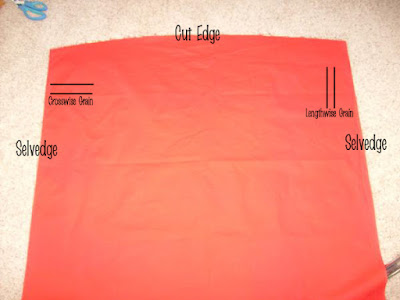
First, we need to know some of the properties of grain in order to understand why we make it the way we do. If you look at your material, selveges on the left and right, the straight across threads (perpendicular to the selvedge and parallel to the cut edges) are referred to as the crosswise grain. They have very little stretch. The threads that are parallel to the selvedges are referred to as the lengthwise grain. They may give more than the crosswise, but still very little stretch. The threads which run at right angles, diagonally across the fabric is the bias grain. Pull in this direction, and the fabric will stretch. A fabric cut on the bias will be very drapy and will curve beautifully. I love making bias skirts!
Therefore, when making bias tape, we will be cutting strips of fabric on the bias grain. Here's the easiest way to do it correctly everytime!
1. Lay your fabric on your cutting board with the selvedges on the left and the right (cut sides are at the top and bottom).
 |
| From Bias Tape |
2. Fold the top right side down at a right angle, so the cut edge meets the left selvedge. The threads parallel to the fold are the bias grain.
 |
| From Bias Tape |
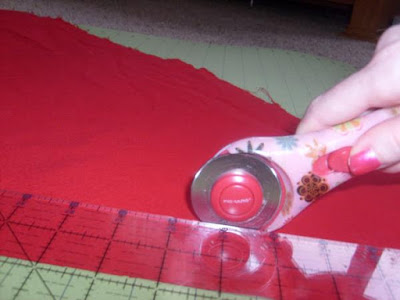
3. Cut strips parallel to the folded edge. I am cutting mine about 1 and 3/4 inches wide, since I am making 1 inch double fold bias tape.
 |
| From Bias Tape |
4. As what usually happens, your strips will not be long enough for your project, so we need to sew them, end to end, in order to make them long enough. But, they have to be sewn in such a way to preserve the bias. Therefore, put two strips together in a right angle.
 |
| From Bias Tape |
5. Sew them together, at a right angle, corner to corner widthwise.
 |
| From Bias Tape |
 |
| From Bias Tape |
6. On the back, there will be a large seam. Trim it to 1/4"
 |
| From Bias Tape |
 |
| From Bias Tape |
7. Press the seam open.
 |
| From Bias Tape |
9. Now, if you are making single fold bias tape, simply fold the strip in half, lengthwise, and press...making sure the seam is on the inside of the fold! Then, you're done! But if you are making double fold bias tape, then you will need to feed the strip into a bias tape maker (I found mine in the quilting section at JoAnn's for around $3). Pull the strip through the maker running your iron behind it, pressing the folds in place.
 |
| From Bias Tape |
10. This is what it will look like as you are making it. Voila! You just made double fold bias tape and it was super easy! Note, as you are feeding the strips into the maker, ensure that the seam is encased in the folds!
 |
| From Bias Tape |
Yes, I definitely need a new cover for the ironing board. Truth be told, it's my moms! It's also just about 40 years old (MUCH older than I am) and a real pain in the neck.
If you have any questions, email me!
No comments:
Post a Comment