Showing posts with label tutorial. Show all posts

Thursday, December 9, 2010

My First Quilt

I love blankets and have a large collection of them, most are on my bed, but many are in strategic places around the house. I love to cuddle under them, lay upon them, I even wear a lap blanket in the car during the winter! Ironically enough, I had never made a blanket. And what better blanket to make than a quilt? This isn't a usual how-to tutorial, because I am still perfecting my quilt making skills. So, this is more of a generalization of how I pieced it together.

My first quilt was far from flawless, but to me, it's perfect. It's a small lap quilt, about 40x60 inches (minus a bit here and there!) Here it is strewn across my couch.

From Quilt


As you can see, I used scraps from my pj bottoms to make one of the borders! So, here's what I did.

1. First, I penciled a little diagram of what I wanted it to look like, then I figured out how large to cut each strip of material. I wanted it to be about 40x60, and with each strip, I needed to include a seam allowance as well. The middle panel (Christmas Trees) is 17x37, then I cut 2 pink strips 4x37 (sides) and 2 pink strips 4x24 (top and bottom), then 2 ornaments 7x35 (top and bottom) and 2 ornaments 7x44 (sides). The final pink border was 2 strips 4x55 (sides) and 4x41 (top and bottom). The red is bias tape.


From Quilt


From Quilt

2. Then, I started piecing it together. I serged the pink strips to the sides and then the top of the Christmas trees. I pressed the seams towards the darker material, which was the solid pink.

From Quilt

3. Then, I added the ornament strips and pressed the seams toward the darker material.

From Quilt

4. I added the second border of pink strips and pressed the seam down. Now, the front panel is finished!

From Quilt

5. I laid down my back panel (which was the pink material), laid the quilt batting on top of it, then laid the front panel on top of that. (Quilters refer to this as assembling the "quilt sandwich.") I used curved safety pins every 4 inches all over the quilt to secure it.

From Quilt


From Quilt

6. Then, I quilted it. I only have a regular sewing machine, not a fancy long armed quilting machine that does all sorts of fancy designs, so I just sewed diagonal lines across the entire quilt, using scotch tape as my guide. Other ways to quilt include handquilting (no way do I have that sort of patience), hand tying (every 4 inches or so across the quilt, make a single stitch through all three layers with yarn and tie a knot to secure), "stitch in the ditch" (stitching along the seams of the borders), etc etc. Basically, anything you want to do is acceptable. It is, after all, your quilt.

From Quilt

7. Then it needed to be bound, because the edges were exposed. I made double fold bias tape and pinned the tape to the edges of the quilt. Don't know how to make bias tape? View my tutorial here!Make Your Own Bias Tape
From Quilt

Then I sewed it in place.

From Quilt

There are many different ways to bind a quilt. This was easiest for me, mainly because I don't have the patience to hand sew anything, which hard core quilters seem to love to do.

And there you have it, my very first quilt! It's super cozy.

From Quilt


Were you inspired? Post pictures of your quilts to the Pineapple Damask Group's Flickr Photo Pool!

Make Your Own Bias Tape

Binding tape has many uses, and most savvy sewers know how to make their own. (You can buy it, but it's a bit pricey.) The most versatile of binding tape is bias tape, so it can curve with the item to which it is bound. Here, I am going to show you how to make single and double fold bias tape.

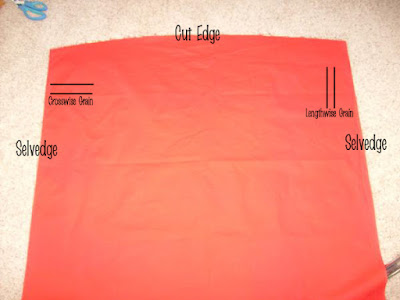
First, we need to know some of the properties of grain in order to understand why we make it the way we do. If you look at your material, selveges on the left and right, the straight across threads (perpendicular to the selvedge and parallel to the cut edges) are referred to as the crosswise grain. They have very little stretch. The threads that are parallel to the selvedges are referred to as the lengthwise grain. They may give more than the crosswise, but still very little stretch. The threads which run at right angles, diagonally across the fabric is the bias grain. Pull in this direction, and the fabric will stretch. A fabric cut on the bias will be very drapy and will curve beautifully. I love making bias skirts!

Therefore, when making bias tape, we will be cutting strips of fabric on the bias grain. Here's the easiest way to do it correctly everytime!

1. Lay your fabric on your cutting board with the selvedges on the left and the right (cut sides are at the top and bottom).

From Bias Tape

2. Fold the top right side down at a right angle, so the cut edge meets the left selvedge. The threads parallel to the fold are the bias grain.

From Bias Tape


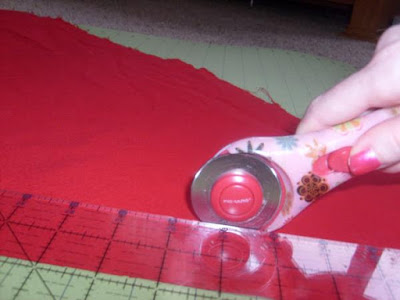
3. Cut strips parallel to the folded edge. I am cutting mine about 1 and 3/4 inches wide, since I am making 1 inch double fold bias tape.

From Bias Tape

4. As what usually happens, your strips will not be long enough for your project, so we need to sew them, end to end, in order to make them long enough. But, they have to be sewn in such a way to preserve the bias. Therefore, put two strips together in a right angle.

From Bias Tape


5. Sew them together, at a right angle, corner to corner widthwise.

From Bias Tape


From Bias Tape


6. On the back, there will be a large seam. Trim it to 1/4"

From Bias Tape


From Bias Tape

7. Press the seam open.

From Bias Tape


9. Now, if you are making single fold bias tape, simply fold the strip in half, lengthwise, and press...making sure the seam is on the inside of the fold! Then, you're done! But if you are making double fold bias tape, then you will need to feed the strip into a bias tape maker (I found mine in the quilting section at JoAnn's for around $3). Pull the strip through the maker running your iron behind it, pressing the folds in place.

From Bias Tape

10. This is what it will look like as you are making it. Voila! You just made double fold bias tape and it was super easy! Note, as you are feeding the strips into the maker, ensure that the seam is encased in the folds!

From Bias Tape


Yes, I definitely need a new cover for the ironing board. Truth be told, it's my moms! It's also just about 40 years old (MUCH older than I am) and a real pain in the neck.

If you have any questions, email me!

Sunday, November 28, 2010

Easy Hems

Heming your pieces properly will give them a professional look - not to mention the correct length! Unless you have a serger, you cannot just fold the material up one time and sew in place. This will fray and eventually come apart! We need to take an extra step to ensure a finished edge to our hems. Here's how to properly hem your garments.

1. Fold the edge down about a quarter of an inch. Press in place with an iron and then pin.
From Creating an Elastic Casing or Hemming with a Sewing Machine


2. Sew in place.
From Creating an Elastic Casing or Hemming with a Sewing Machine


3. Fold down again, to a width you have determined for your hem. Press and then pin in place.
From Creating an Elastic Casing or Hemming with a Sewing Machine


4. Sew in place.
From Creating an Elastic Casing or Hemming with a Sewing Machine


5. Set the stitches by pressing with your iron.
From Creating an Elastic Casing or Hemming with a Sewing Machine


That's all there is to it!

How to Create an Elastic Casing

Using elastic waistbands is a quick and very easy alternative to zippers or buttons. In fact it's my preferred type of waistband, and even sometimes armbands or neckbands! Here's how to make a casing for your elastic - it's a breeze!

1. Fold down the top of your material about a quarter of an inch. I press down with my iron and then pin in place.

From Creating an Elastic Casing or Hemming with a Sewing Machine


2. Sew in place.

From Creating an Elastic Casing or Hemming with a Sewing Machine


3. Fold down again to a width that is wide enough for your elastic band, plus a seam allowance. I am using a 1/2 inch band and I like to use a 1/4 inch seam allowance, so I am folding the top down 3/4 of an inch. I press in place with a hot iron, then pin.

From Creating an Elastic Casing or Hemming with a Sewing Machine


4. Begin to sew in place.

From Creating an Elastic Casing or Hemming with a Sewing Machine


5. When you come back around, stop sewing about an inch or sew from the beginning, in order to leave a place for you to feed your elastic band inside the casing.

From Pj Bottom Tutorial


6. Cut your elastic band to the size you need. Many instructions say to cut it an inch longer than your measurement. (For example, if your waist is 32 inches, you would use 33 inches of elastic band.) I have found, however, that this almost makes it too big. I like the elastic to stretch a bit, so I know that it won't fall down. Therefore, I do not add the extra inch.

From Pj Bottom Tutorial


7. Secure a safety pin to the end of the elastic and use it as a tool to shimmy the elastic through the casing.

From Pj Bottom Tutorial


8. Ensure the elastic is not twisted anywhere and then pin the two ends together, overlapping them about a 1/2 inch or so, with your safety pin.

From Pj Bottom Tutorial


9. Sew the two ends together. I usually use a zig zag stitch, straight down the middle of the overlapped ends. Others, however, use a straight stitch and sew along the edges, in a square.
From Pj Bottom Tutorial


10. Feed the elastic fully into the casing and sew the opening shut.
From Pj Bottom Tutorial


11. Finally, set the stitches with your iron.
From Creating an Elastic Casing or Hemming with a Sewing Machine

Finished! Great job!

Sew a Seam with a Sewing Machine

A serger gives a finished edge to an item, which will not fray. When material is sewn with a sewing machine, the edges are not encased and may fray. If you do not own a serger, there are several techniques which will reduce fraying. Here's one super easy method to sew a seam which should not fray.

1. Line your material up, WRONG sides out (RIGHT sides facing). Pin together.


From Sew a Seam with a Sewing Machine


2. Using pinking shears, cut the very edge of the material. Pinking shears have a zig-zag edge, which limits the length of a frayed thread, minimizing damage.

From Sew a Seam with a Sewing Machine


3. Paying attention to seam allowance, being to sew the edge. It is important to backstitch for a few stitches at the beginning in order to secure the thread, which will prevent the stitches from coming out. Try to sew a straight line, using the marks on your faceplate as guides. At the end, backstitch for a few stitches again to secure the thread.

From Sew a Seam with a Sewing Machine


4. To set the stitches, press the seam closed. Simply, glide the hot iron along the stitches, letting the weight of the iron doing all the work.

From Sew a Seam with a Sewing Machine


5. Finally, press the seam open. This will ensure the seam lays flat, and will create a "cleaner" look when sewing hems and/or other pieces to the existing piece. It will make more sense as you continue to learn to sew.

From Sew a Seam with a Sewing Machine


You should now have a finished seam, which should resist fraying!
From Sew a Seam with a Sewing Machine